Computer setup
We will be using a really neat little computer called a Raspberry Pi in this course. This page will guide you through setting up your computer for Foundations of Coding.

1. Hardware
Work through the following steps with your group:
- Check your materials. You should be sitting at a table with a monitor, a keyboard, a mouse, and a Raspberry Pi in a little case.
- Power. The Pi and the monitor should both be plugged into the outlet underneath the desk. Make sure you see the little power light on the Pi, and make sure the monitor turns on.
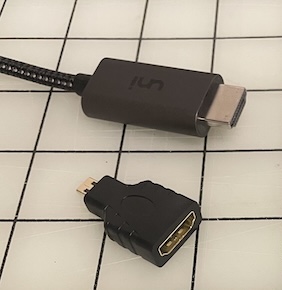
- Data. Connect the Pi to the monitor using a HDMI to microHDMI cable.
Some may have an adapter from the HDMI cable to micro HDMI as shown below. - Input. Plug in your keyboard and mouse into the USB ports on the pi.
2. Upgrade the software
Let's make sure the Pi has the latest versions of its software. Open up the Terminal app. In Terminal, you type commands, press enter, and then the computer responds. We're going to use Terminal a lot in this course--don't worry if it feels really unfamiliar at first!
💻
Type each of the following commands (one at a time) and press enter after each.
sudo literally means super-user do, or "do this command as a superuser/admin."
sudo apt update
sudo apt full-upgrade
Then you'll see lots and lots of output--this is normal.
3. Create your account
You are currently logged into the Pi using the default user. Now you are going to create your own user account.
In the command below, replace <username> with your username.
sudo adduser <username>You will be asked for a password--for security, you won't see the charaters you type. Then you'll be asked for a bunch of optional details, like your room number. Just press enter to skip all this.
Now we are going to disable auto-login.
- Enter
sudo raspi-configand press enter. - Go to System Options.
- Select Auto Login.
- Select No on the next two screens to disable auto login so that you will need to choose a user when you restart the pi.
- Select Finish, and then close the window.
- Reboot the Pi using
rebootin the terminal.
Let's add your new account into the super user group. This will avoid some issues with updates as we move forward. login to the pi as the admin username: lhsmwc password: lockportmwc
sudo usermod -aG sudo <username>
reboot4. Setup Making With Code
Now we will install some software packages we'll need. Again, type in each of these commands and press enter.
curl -LsSf https://astral.sh/uv/install.sh | sh
uv tool install making-with-code-cliAlmost there! Now we are going to set up your Making With Code account. Once again, open Terminal and run the following command:
mwc setup